Why a Structured Google Tag Manager Tutorial Saves You from Tracking Chaos
If you have ever stared at a website full of untracked buttons, broken conversion pixels, and a developer who keeps saying “just add it to the theme file,” this google tag manager tutorial is built for exactly that moment. Tag management is one of those disciplines where a clean process beats raw talent every single time.
Here is the honest truth: most teams do not fail at analytics because the tools are weak. They fail because every marketing hire pastes a new script into the template, nobody documents it, and six months later nobody can tell which pixel fires where. A tag manager exists to end that cycle.
This google tag manager tutorial guide walks you through ten concrete steps, in order, with the practical detail you need to actually ship a working container. No fluff, no theory dumps. Just the sequence a competent practitioner follows on a real site, plus the mistakes that quietly break setups in the field.
What is Google Tag Manager and Why Should You Care?
Google Tag Manager is a free tag management system the google tag manager tutorial lets you deploy and manage marketing and analytics tags from a single container snippet instead of editing site code for every new tool. You add one piece of code to your site, then control everything else from a web interface.
Think of the google tag manager tutorial as a switchboard. Your website has one phone line into the building, and the tag manager routes calls to the right department — analytics, ads, heatmaps, consent tools, CRM connectors. When a new tool arrives, you do not rewire the building. You add a route.
The practical payoff is speed and safety. A marketer can publish a new conversion tag in minutes without waiting on a sprint. A developer stops getting tickets that read “please add this snippet before the closing body tag.” Everyone wins, provided the setup is disciplined.
How the Container, Tags, Triggers, and Variables Fit Together
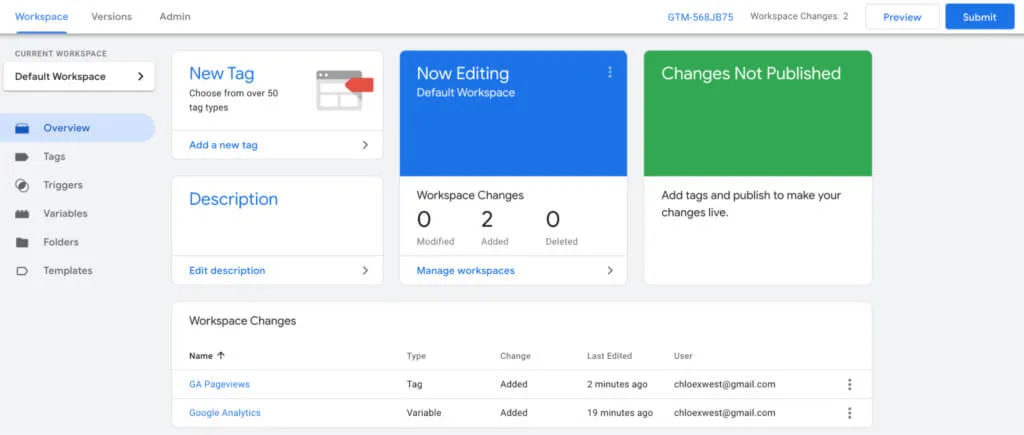
The whole system rests on four building blocks, and understanding them early makes the rest of this google tag manager tutorial far easier to follow. A container is the box that holds your configuration. Tags are the actual snippets that do something — fire a pixel, send an event, load a script.
Triggers decide when a tag runs. A trigger might be “page view on all pages” or “click on a button with this class.” Variables fill in the blanks, like pulling the page path, a click URL, or a data layer value into the tag at runtime.
Once you internalize that chain — container holds tags, triggers fire them, variables feed them — debugging becomes a logic exercise rather than guesswork. That mental model is the single most valuable takeaway from any google tag manager tutorial for beginners.
| Component | What It Does | Everyday Example |
|---|---|---|
| Container | Stores all tags, triggers, and variables for one site | One container for your main domain |
| Tag | The snippet that sends data or loads a tool | Google Analytics 4 page view tag |
| Trigger | Defines when a tag fires | Form submission click on the contact page |
| Variable | Supplies dynamic values to tags and triggers | Page URL, click text, data layer value |
Before You Start: Prerequisites and a Google Tag Manager Tutorial Checklist
Jumping into the interface without preparation is how containers end up messy. Run through this google tag manager tutorial checklist before you touch a single tag, and you will save hours of cleanup later.
You need edit access to your website’s theme or a CMS that accepts custom code. You need a Google account. You need to know which tools you are actually deploying — analytics, ads, or both. And you should have a staging environment or at least a low-traffic page to test on.
- Confirm site access. Know where your header and body code live, whether that is a theme file, a CMS injection field, or a plugin.
- List your intended tools. Write down every platform that needs a tag so you do not forget one mid-setup.
- Set up a test page. A staging URL or a hidden page keeps experiments away from real visitors.
- Agree on naming conventions. Decide now how tags and triggers will be named so the container stays readable.
- Check consent requirements. Know whether your region or audience requires a consent banner before tags fire.
The google tag manager tutorial checklist sounds mundane, but skipping it is the root cause of most “why is my tag firing twice” support threads. Preparation is not overhead. It is the difference between a container you can audit and one you dread opening.

Google Tag Manager Tutorial: Easy 10-Step Tutorial
Here is the core of this google tag manager tutorial — ten sequential steps that take you from an empty account to a live, verified container. Follow them in order the first time. After that, you can jump around as needed.
Step 1: Create Your Account and Container
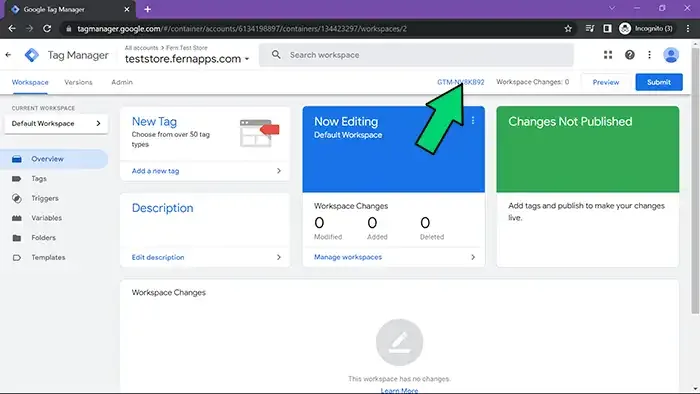
Sign in to tagmanager.google.com and create an account. Name it after your organization, then set up a container for your website. Choose “Web” as the container type unless you are specifically deploying for mobile apps or server-side.
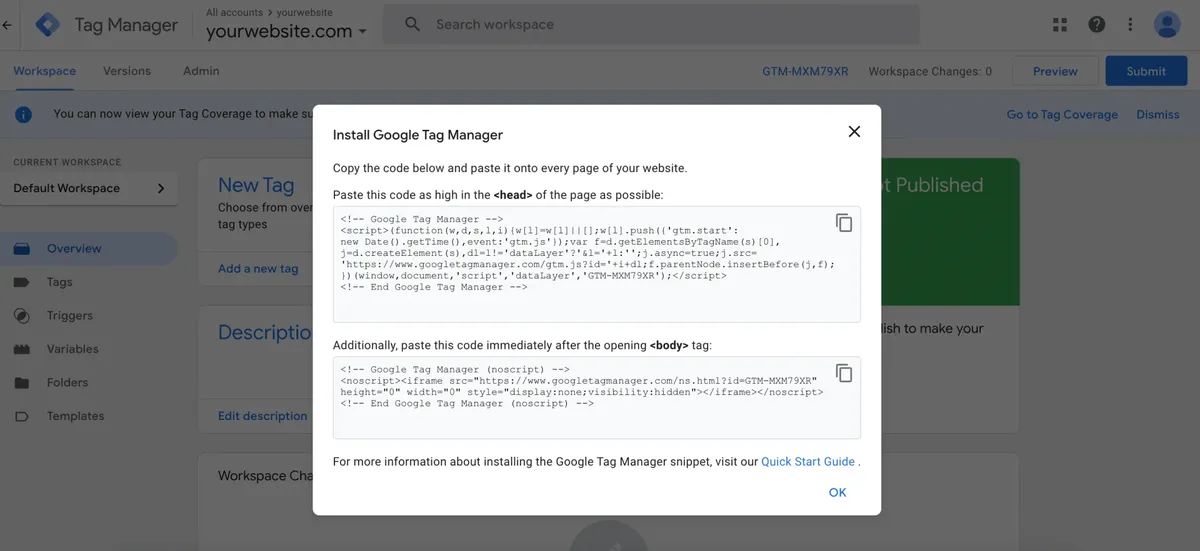
The container ID looks like GTM-XXXXXXX. Refining each detail of your google tag manager tutorial strengthens this section. Copy it somewhere safe; you will need it in the next step. Resist the urge to create multiple containers “just in case” — one well-organized container per site is far easier to manage.
If you run several domains, use separate containers and a clear naming scheme. This small decision pays off enormously when you audit tags months later, and it is one of the google tag manager tutorial best practices that seasoned teams never skip.
Step 2: Install the Container Snippet on Your Site
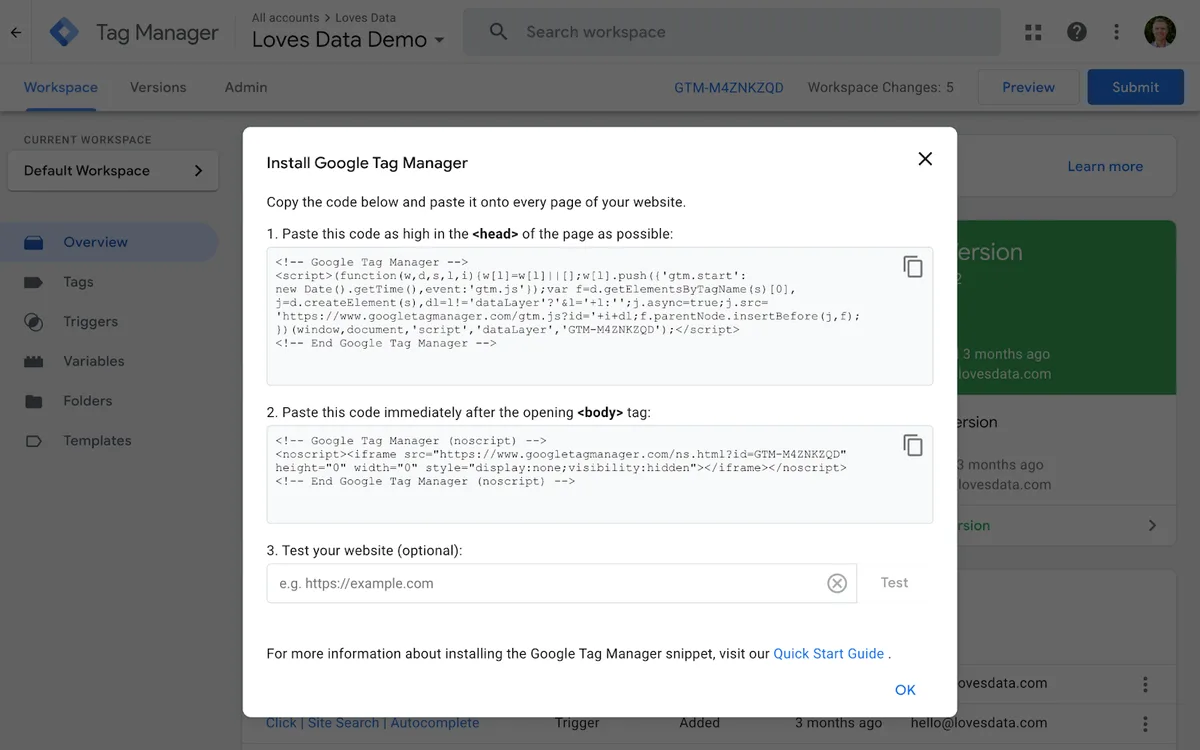
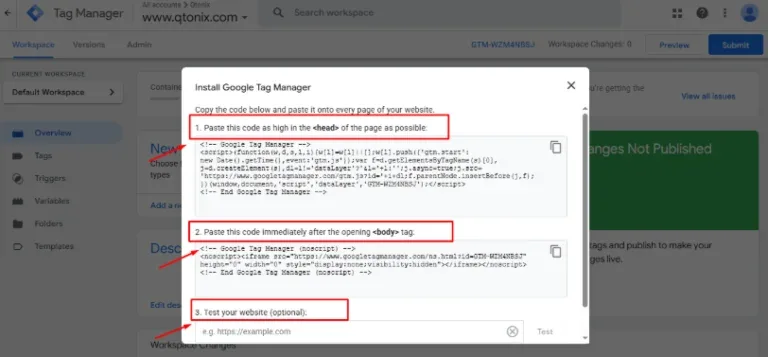
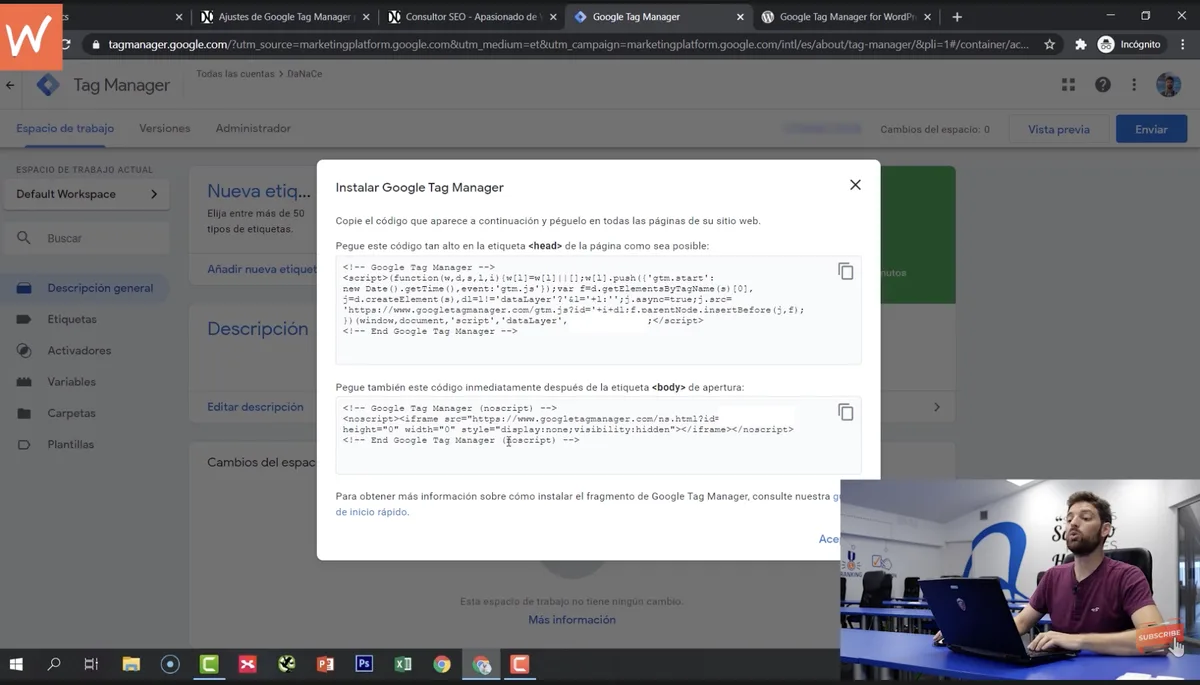
Tag Manager gives you two snippets. One goes as high as possible in the <head>, and the second goes immediately after the opening <body> tag. Both matter, and placing them correctly prevents a long list of mysterious tracking gaps.
On WordPress, you can paste these into a header/footer injection plugin or your theme’s functions file. On Shopify or Squarespace, use the built-in custom code fields. On a custom build, hand the snippets to your developer with clear placement instructions.

Verify installation with the Tag Assistant tool or by checking the page source. Effective execution in your google tag manager tutorial makes a tangible difference. If the container snippet is missing or misplaced, nothing downstream will work — so confirm this before moving on.
Step 3: Set Up Your First Tag for Analytics
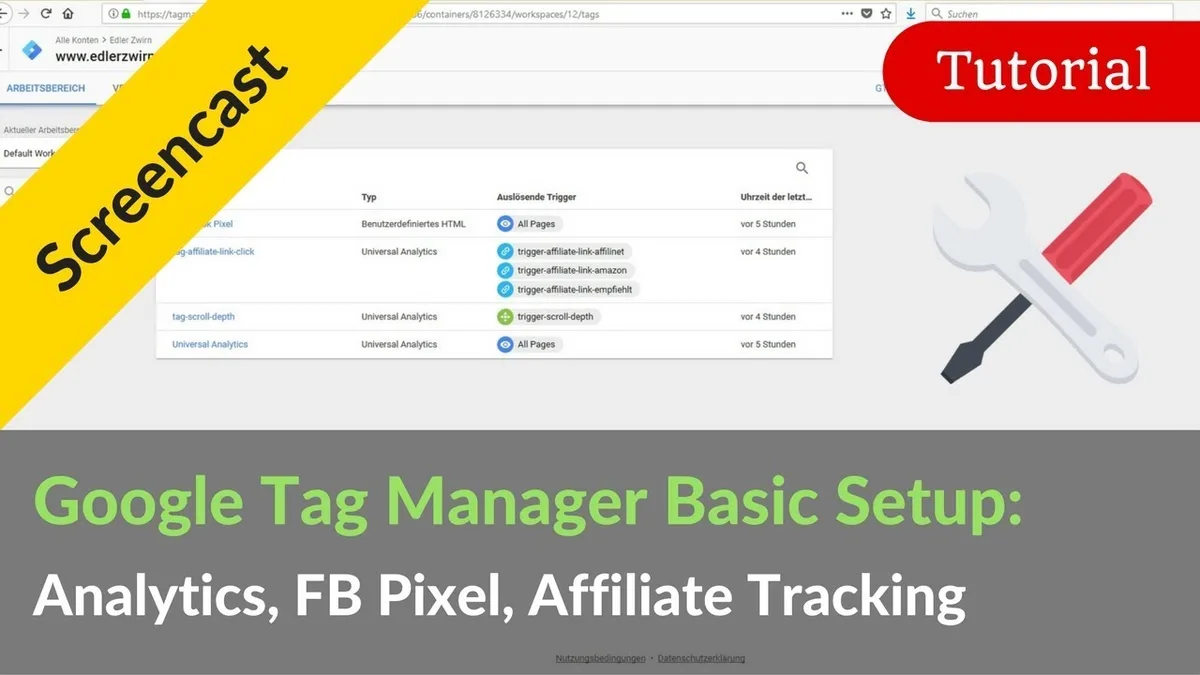
Create a new tag and choose your analytics platform — for most teams that means a Google Analytics 4 configuration tag. Enter your measurement ID, then attach a trigger. The simplest trigger is “All Pages” page view, which fires the tag everywhere.
Name the tag descriptively, something like “GA4 – Config – All Pages.” Vague names like “Tag 1” turn a container into a puzzle. Descriptive naming is a small habit with outsized returns.
Save the tag but do not publish yet. You still need to test, and testing before publishing is the discipline that separates a clean launch from a messy one.
Step 4: Build Triggers That Match Real User Actions
Triggers are where tracking gets interesting. Beyond page views, you will want click triggers for buttons, form submission triggers for lead capture, and scroll or timer triggers for engagement signals.
Start with the built-in trigger types before reaching for custom code. Maintaining clarity across your google tag manager tutorial remains essential. A “Click – All Elements” trigger filtered by a CSS selector or click text handles most button tracking needs. A form trigger catches successful submissions on standard forms.
Test each trigger in Preview mode and watch it fire in real time. If a click trigger fires on the wrong element, tighten the condition rather than adding exceptions. Clean triggers keep the whole container predictable.
Step 5: Configure Variables for Dynamic Data
Variables pull live values into your tags. Built-in variables like Page URL, Click Text, and Form ID cover a surprising amount of ground once you enable them in the Variables menu.
For richer data, use the data layer. A data layer is a JavaScript object that your site pushes structured information into — user type, product ID, purchase value, membership status. Tags then read from it cleanly.
When you push to the data layer, keep key names consistent and documented. Inconsistent naming is one of the most common google tag manager tutorial tips failures, and it silently breaks reporting weeks after launch.
Step 6: Use Preview Mode to Test Everything
Preview mode is your safety net. Click Preview, load your site, and the Tag Assistant panel shows every tag that fires, every trigger that matched, and every variable value in context.
Walk through the key user journeys: landing page, navigation, form submission, checkout if relevant. A thoughtful approach to google tag manager tutorial reinforces your qualifications. Confirm each tag fires exactly once when it should and never when it should not. Double-firing is a classic symptom of duplicate triggers or a tag mistakenly set to fire on all pages.
Do not publish until Preview mode looks clean across your main journeys. This is the single most important quality gate in any google tag manager tutorial workflow.
Step 7: Publish Your Container Version
Publishing creates a version snapshot of your container. Give it a clear name and description — “Added GA4 config and contact form trigger” beats “update” every time. Version notes are your future self’s best friend.
After publishing, verify in the live environment using Tag Assistant or your analytics real-time reports. A tag that works in Preview but not live usually points to a snippet placement issue or a consent gate blocking execution.
Keep a habit of publishing in small, labeled batches. Large unpublished changes are hard to debug and harder to roll back if something breaks.
Step 8: Set Up Conversions and Key Events
Conversion tracking is where tag management earns its keep. Define the actions that matter — form submissions, demo requests, purchases, newsletter signups — and build dedicated tags and triggers for each.
Map each conversion to the right destination: analytics key events, ad platform conversion pixels, or both. Structuring your google tag manager tutorial around proven patterns ensures impact. Be precise about which trigger represents a genuine conversion versus an intent signal like a button click.
Test conversions end-to-end with a real submission in Preview mode. A conversion tag that fires on the wrong event inflates numbers and poisons your reporting, which is worse than no tracking at all.
Step 9: Add Consent Handling and Privacy Controls
Privacy is not optional. If your audience includes regions with consent requirements, tags must respect user choices. Tag Manager supports consent settings and consent mode integrations that gate tags based on the user’s decision.

Connect your consent management platform or configure consent types directly in the container. Tags that require consent should be set to wait for it rather than fire immediately.
Document your consent logic alongside your tag setup. When a privacy review or audit arrives, clear documentation turns a stressful scramble into a quick answer — a mark of mature google tag manager tutorial best practices.
Step 10: Document, Audit, and Maintain
The final step is the one most teams skip. Document every tag, its purpose, its trigger, and its owner. Keep a simple spreadsheet or a shared note that maps tags to business goals.
Schedule periodic audits — quarterly works well — to remove dead tags, fix broken triggers, and confirm conversions still fire correctly. Applying these principles to your google tag manager tutorial yields measurable results. Containers rot quietly when nobody tends them.
Treat the container like a product, not a junk drawer. That mindset, more than any single technique, is what separates a maintainable setup from a liability.
Google Tag Manager Tutorial Tips That Prevent Real-World Failures
Knowing the steps is one thing. Avoiding the traps that break real deployments is another. These google tag manager tutorial tips come straight from the patterns that cause the most support headaches.

First, never test in production without Preview mode. Second, name everything descriptively. Third, publish in small batches with clear version notes. Fourth, keep the data layer documented and consistent.
Fifth, watch for duplicate firing — it is almost always a trigger overlap or a tag set to fire on all pages when it should not. Sixth, verify snippet placement in the page source, not just in the interface.
- Use Preview mode before every publish. It catches duplicate firing, missing triggers, and variable errors instantly.
- Adopt a strict naming convention. Prefix tags by tool and purpose so the container stays scannable.
- Document data layer pushes. An undocumented data layer is a future debugging nightmare.
- Audit tags quarterly. Remove dead tags and confirm conversions still fire correctly.
- Test consent flows end-to-end. Confirm tags wait for consent and fire after acceptance.
None of these tips are glamorous. All of them are what keeps a container healthy over months and years, which is the real goal of any serious google tag manager tutorial.
Google Tag Manager Tutorial Best Practices for Long-Term Health
Best practices are about durability. A container that works today but becomes unreadable in six months is not a success. These google tag manager tutorial best practices keep your setup maintainable as your team and toolset grow.
Adopt a naming taxonomy from day one: tool, action, and scope. Something like “GA4 – Event – Form Submit” tells anyone exactly what a tag does. Pair it with a version note that explains the why, not just the what.
Keep the data layer as the single source of truth for structured data. Proper attention to your google tag manager tutorial sets a strong baseline. Avoid scraping values from the DOM when a clean data layer push is possible — DOM scraping breaks the moment a designer changes a class name.
Finally, treat consent and privacy as first-class concerns, not afterthoughts. Tags that respect user choices build trust and reduce legal risk, and that discipline is what mature teams actually practice.
Common Mistakes This Google Tag Manager Tutorial Helps You Avoid
Most tag manager failures fall into a handful of predictable buckets. Knowing them in advance is half the battle, and this google tag manager tutorial is designed to steer you around each one.
The most common mistake is publishing without testing. The second is a misplaced snippet — usually the body snippet missing entirely. The third is duplicate firing caused by overlapping triggers.
Beyond the google tag manager tutorial, watch for vague naming, undocumented data layers, and conversions that fire on intent signals rather than real actions. Each of these quietly corrupts your data, and corrupted data is worse than missing data because it looks trustworthy.
Another frequent trap is over-tagging. Every extra tag adds page weight and complexity. Audit ruthlessly and remove anything that no longer serves a decision. Lean containers are fast containers.
Frequently Asked Questions About This Google Tag Manager Tutorial
Here is an in-depth breakdown of key considerations regarding this section:
Do I Need a Developer to Use Anthropic Tag Manager?
Not for most day-to-day tasks. Once the container snippet is installed, marketers can create tags, triggers, and variables from the interface without touching code. Complex data layer work may still need a developer, but routine tracking does not.
How Long Does This Google Tag Manager Tutorial Take to Complete?
A basic setup — account, container, snippet, first analytics tag — takes under an hour for someone with site access. The full ten steps, including conversions and consent, typically span a few working sessions depending on your toolset.
What is the Difference Between a Tag and a Trigger?
A tag is the snippet that does something, like sending a page view or a conversion event. A trigger is the condition that decides when that tag runs. Tags act; triggers decide when.
Can Google Tag Manager Slow Down My Website?
The google tag manager tutorial can if you load dozens of heavy tags. The container itself is lightweight, but each tag adds requests and processing. Audit regularly and remove tags that no longer serve a purpose to keep performance healthy.
How Do I Know My Tags are Firing Correctly?
Use Preview mode and Tag Assistant to watch tags fire in real time. Confirm each tag fires exactly once on the right action, then verify in your analytics real-time reports after publishing.
Do I Need Separate Containers for Different Tools?
No. One container can hold tags for analytics, ads, heatmaps, and consent tools simultaneously. Separate containers are usually reserved for separate domains or distinct business units.
Where This Google Tag Manager Tutorial Fits in Your Broader Tracking Strategy
Tag management is the foundation of a larger measurement stack. Once your container is clean, the natural next topics are event taxonomy design, server-side tagging, and conversion attribution modeling.
Each of those builds directly on the discipline this google tag manager tutorial establishes: test before publishing, document everything, and keep the container lean. Skip that discipline and the advanced topics collapse into more chaos.
The teams that get the most from their analytics are rarely the ones with the most tools. They are the ones with the cleanest, best-documented containers and a habit of auditing them. Start with the ten steps, run the checklist, and iterate. That is how a google tag manager tutorial turns into a durable capability rather than a one-time setup.
If you take one thing from this guide, make it this: the interface is easy, but the discipline is what matters. Build the habit of testing, naming, and documenting from day one, and your container will stay trustworthy long after the initial setup is forgotten.
For deeper reference, the official Google Tag Manager documentation is the authoritative source to bookmark alongside this google tag manager tutorial.